Bulk Create Properties: Step-by-Step Guide
This guide walks through every step of the Bulk Create Properties wizard. By the end, you will have a Cloud Task queued that creates your property group and all defined properties in the target HubSpot portal.
Prerequisites
Section titled “Prerequisites”Before starting, confirm the following:
- You have at least one HubSpot portal connected to your JetStack AI workspace
- The connected portal has sufficient permissions for property creation (the OAuth scope
crm.schemas.contacts.writeor equivalent for your target object type) - You know the object type you want to add properties to (Contact, Company, Deal, Ticket, or a Custom Object)
- You have your property definitions ready — at minimum, an internal name and display name for each
Step 1: Choose Target
Section titled “Step 1: Choose Target”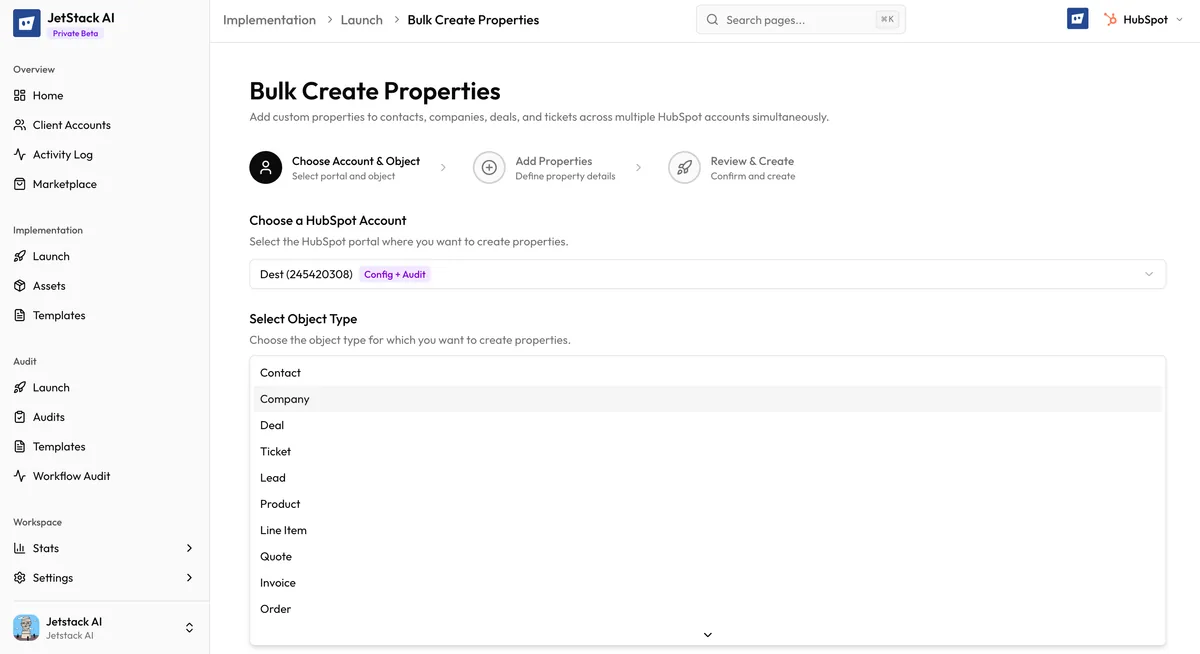
Navigate to Implementations > Bulk Create Properties and begin the wizard.
Select Portal
Section titled “Select Portal”Use the portal dropdown to choose which connected HubSpot account receives the new properties. The dropdown shows all portals connected to your workspace, identified by portal name and Hub ID.
Select Object Type
Section titled “Select Object Type”Choose the CRM object type these properties will belong to:
- Contact
- Company
- Deal
- Ticket
- Custom Object — if selected, an additional dropdown appears listing the custom object types defined in the target portal
Define Property Group
Section titled “Define Property Group”Enter the group name (required). This is the internal identifier used by HubSpot’s API. Use lowercase with no spaces — for example, lead_qualification or onboarding_data.
Optionally, enter a group label. This is the human-readable name displayed in HubSpot’s property settings UI. If left blank, the group name is used as the label.
If a group with this name already exists in the target portal, JetStack AI adds the new properties to it. No duplicate group is created.
Click Next to proceed to Step 2.
Step 2: Define Properties
Section titled “Step 2: Define Properties”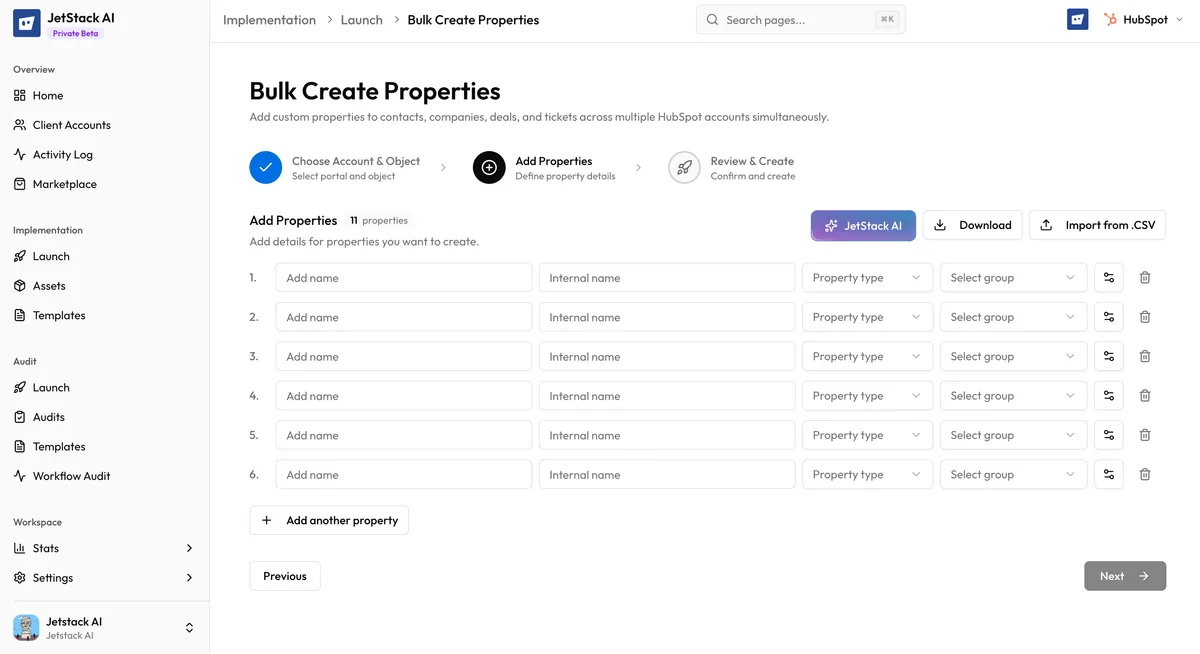
This step presents a table editor where you define each property.
Adding Properties Manually
Section titled “Adding Properties Manually”Click Add Property to insert a new row. Each row contains the following fields:
| Field | Required | Description |
|---|---|---|
| Internal Name | Yes | The API-level identifier. Must be unique within the object type. Use lowercase letters, numbers, and underscores. |
| Display Name | Yes | The label shown to users in HubSpot’s UI. |
| Type | Yes | The property type (text, number, date, select, radio, checkbox, etc.). Selected from a dropdown. |
| Description | No | A short explanation shown as help text in HubSpot. |
| Is Unique | No | Checkbox. When enabled, HubSpot enforces that no two records share the same value for this property. |
| Options | Conditional | Required for select, radio, and multiple checkbox types. Define the list of available choices. |
Defining Options for Select Types
Section titled “Defining Options for Select Types”When you choose a type that requires options (dropdown select, radio select, or multiple checkboxes), an Options editor appears for that row. Each option needs:
- Value — the internal value stored by HubSpot
- Label — the display text shown to users
Add as many options as needed. You can reorder options by dragging, or remove them individually.
CSV Upload
Section titled “CSV Upload”For large property sets, click Upload CSV to import definitions from a file. The CSV must include the following columns:
internalName— the property’s API namedisplayName— the property’s UI labeltype— the property type (must match one of the supported type identifiers)description(optional) — help textisUnique(optional) —trueorfalseoptions(optional) — semicolon-separated list ofvalue:labelpairs
After upload, the imported rows appear in the table editor. You can edit, reorder, or delete any row before proceeding.
Editing and Deleting
Section titled “Editing and Deleting”Each property row has Edit and Delete actions. Click Edit to modify any field inline. Click Delete to remove the property from the batch.
Validation
Section titled “Validation”Before advancing to Step 3, JetStack AI checks:
- Every property has an internal name and display name
- No two properties share the same internal name
- Properties with select/radio/checkbox types have at least one option defined
- Internal names contain only valid characters (lowercase alphanumeric and underscores)
If validation fails, the specific rows with issues are highlighted and an error message explains what needs correction.
Click Next to proceed to Step 3.
Step 3: Review & Create
Section titled “Step 3: Review & Create”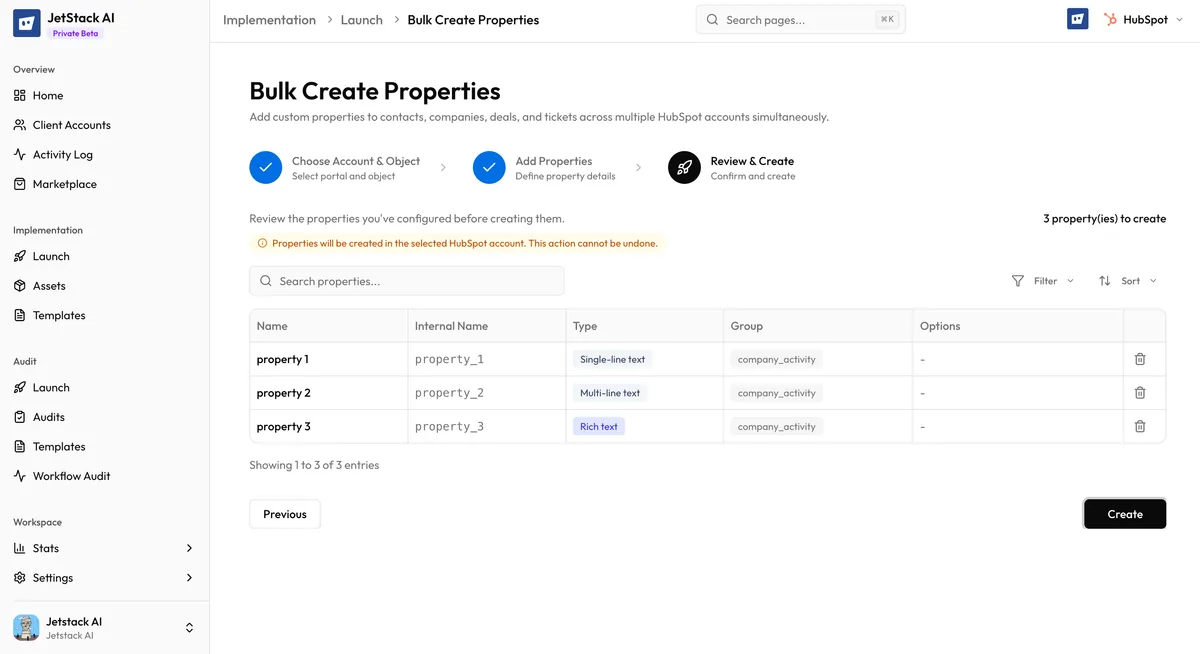
The final step displays a summary table of everything you are about to create:
- Target Portal — the portal name and Hub ID
- Object Type — the selected CRM object type
- Property Group — the group name and label
- Properties — a table listing every property with its internal name, display name, type, description, uniqueness flag, and options count
Review the summary carefully. Use the Back button to return to previous steps and make corrections.
When satisfied, click Create Properties.
What Happens After Submission
Section titled “What Happens After Submission”Clicking Create Properties triggers the following sequence:
- A Cloud Task is created containing the full batch configuration
- You are redirected to the Activity Log where the task appears immediately
- The task status shows Processing while JetStack AI creates the group and properties via the HubSpot API
- When complete, the status updates to Completed (all properties created) or Partial (some properties failed)
Individual property results are visible in the task detail view. Each property shows either a success confirmation or the specific error returned by HubSpot.
Next Steps
Section titled “Next Steps”- How It Works — Technical details of the creation pipeline
- Troubleshooting — Common errors and how to fix them