Selecting Assets to Deploy
The deploy wizard guides you through choosing a target portal and selecting which assets from your library to deploy. This page covers the first two steps of the four-step wizard. For the mapping and review steps, see Property & Asset Mapping and the subsequent mapping guides.
The Deploy Wizard
Section titled “The Deploy Wizard”The deployment process uses a four-step wizard:
- Choose Account — Select the target portal and name the implementation
- Select Assets — Pick assets from your library
- Map — Configure property, pipeline, owner, and other mappings
- Review & Implement — Final summary and confirmation
This page covers steps 1 and 2 in detail.
Step 1: Choose Account
Section titled “Step 1: Choose Account”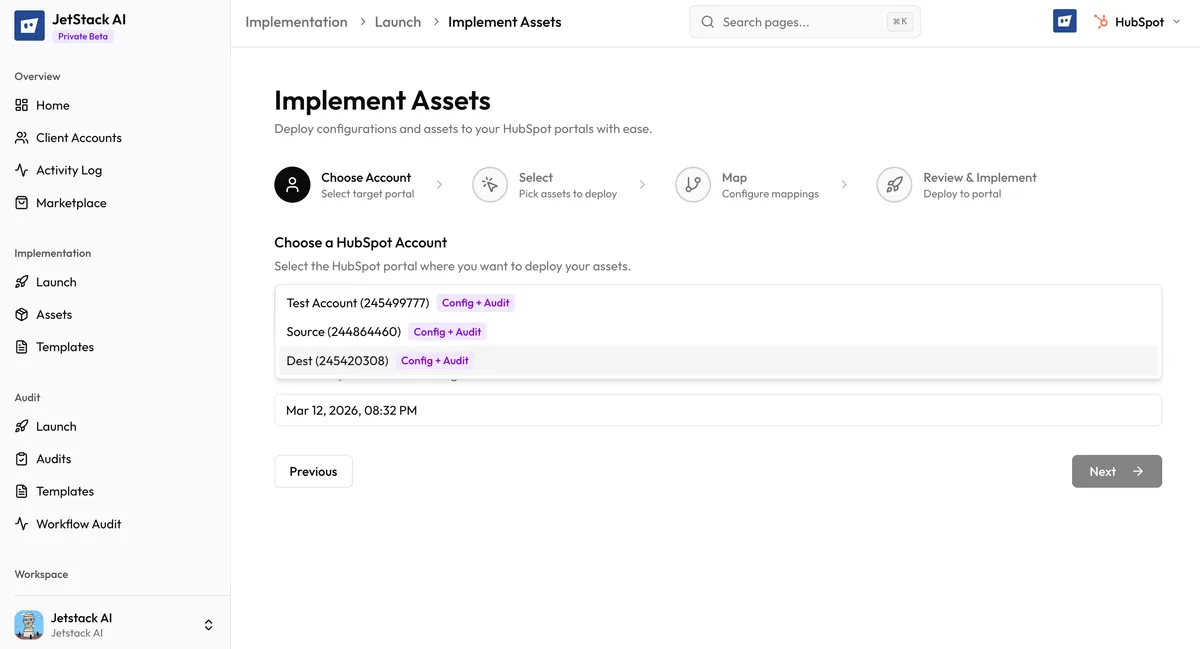
To start a new deployment, navigate to Implementations in the sidebar and click New Implementation. You are presented with the account selection screen.
Select a Target Portal
Section titled “Select a Target Portal”Choose which connected HubSpot portal will receive the deployed assets. The dropdown shows all portals connected to your JetStack AI organization with their portal name and ID.
Only portals with active OAuth connections appear in the list. If a portal shows as disconnected, you will need to reconnect it before deploying.
Name the Implementation
Section titled “Name the Implementation”Enter a descriptive name for this implementation. This name appears in your activity history and helps you identify this specific deployment later. Examples:
- “Acme Corp - Marketing Automation Setup”
- “Client Portal - Pipeline + Properties”
- “Q1 Onboarding Package - Full Deploy”
The name is for your reference only and does not affect anything in the target HubSpot portal.
Click Next to proceed to asset selection.
Step 2: Select Assets
Section titled “Step 2: Select Assets”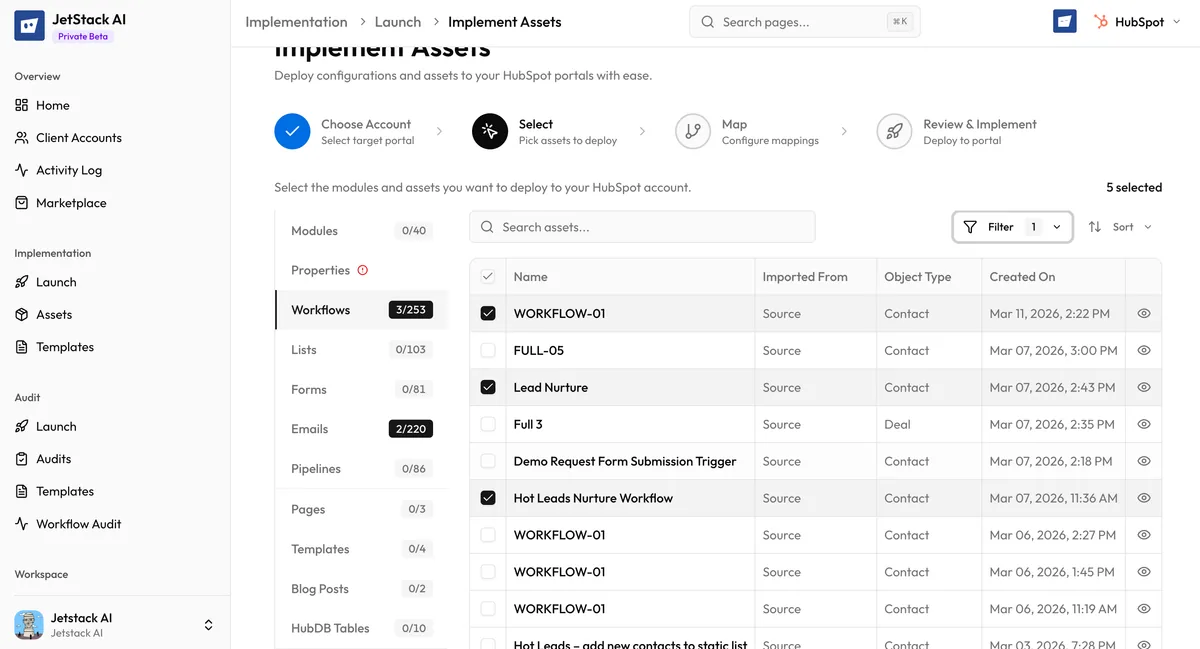
The asset selection screen shows your entire JetStack AI library. From here, you choose exactly which assets to deploy to the target portal.
Browsing Your Library
Section titled “Browsing Your Library”The selection interface displays all assets currently in your library, organized by asset type. Each asset shows:
- Asset name — The name as it was imported from the source portal
- Asset type — Workflow, form, email, page, template, list, pipeline, property, etc.
- Source portal — Which portal the asset was originally imported from
- Import date — When the asset was added to your library
Filtering and Searching
Section titled “Filtering and Searching”Use the toolbar to narrow down the asset list:
- Search — Type any part of an asset name to filter the list in real time.
- Filter by type — Select one or more asset types to show only workflows, only forms, etc.
- Sort — Sort by name, type, or date to find assets quickly.
For large libraries, combining search with type filters is the fastest way to locate specific assets.
Selecting Individual Assets
Section titled “Selecting Individual Assets”Click the checkbox next to each asset you want to deploy. Selected assets are highlighted and a running count is displayed in the toolbar.
You can select assets across multiple types in a single deployment. For example, you might select 3 workflows, 5 properties, 2 forms, and 1 pipeline — all in one pass.
Selecting Modules and Templates
Section titled “Selecting Modules and Templates”Modules and templates can be selected individually like any other asset. When you select a module or template, its dependencies are automatically included in the deployment. For example:
- Selecting a page template also queues the template’s custom modules for deployment.
- Selecting a module includes any child modules or partials it depends on.
- Selecting a landing page includes its template, referenced forms, and any modules used on the page.
You do not need to manually hunt down every dependency. The deploy engine resolves the full dependency tree at deploy time. However, you can review what will be included on the Review step before confirming.
Selecting from a Previous Import
Section titled “Selecting from a Previous Import”If you recently completed an import, the assets from that import are already in your library and available for selection. There is no separate “deploy this import” action — you always select from the unified library.
This means you can combine assets from multiple imports into a single deployment. Assets imported from Portal A and Portal B can be deployed together into Portal C.
How Many Assets Can You Deploy at Once?
Section titled “How Many Assets Can You Deploy at Once?”There is no hard limit on the number of assets in a single deployment. However, keep in mind:
- Large deployments take longer — Each asset requires one or more HubSpot API calls. A deployment with 200+ assets may take several minutes.
- API rate limits — HubSpot enforces rate limits on API calls. JetStack AI handles rate limiting automatically with intelligent retry logic, but very large deployments may take longer as the engine throttles requests.
- Mapping complexity — The more asset types you include, the more mapping configurations may be required in the next step. Deploying properties + pipelines + workflows + emails together may require property mappings, pipeline mappings, and owner mappings.
For first-time deployments, start with a smaller batch to familiarize yourself with the mapping and review process.
What Happens Next
Section titled “What Happens Next”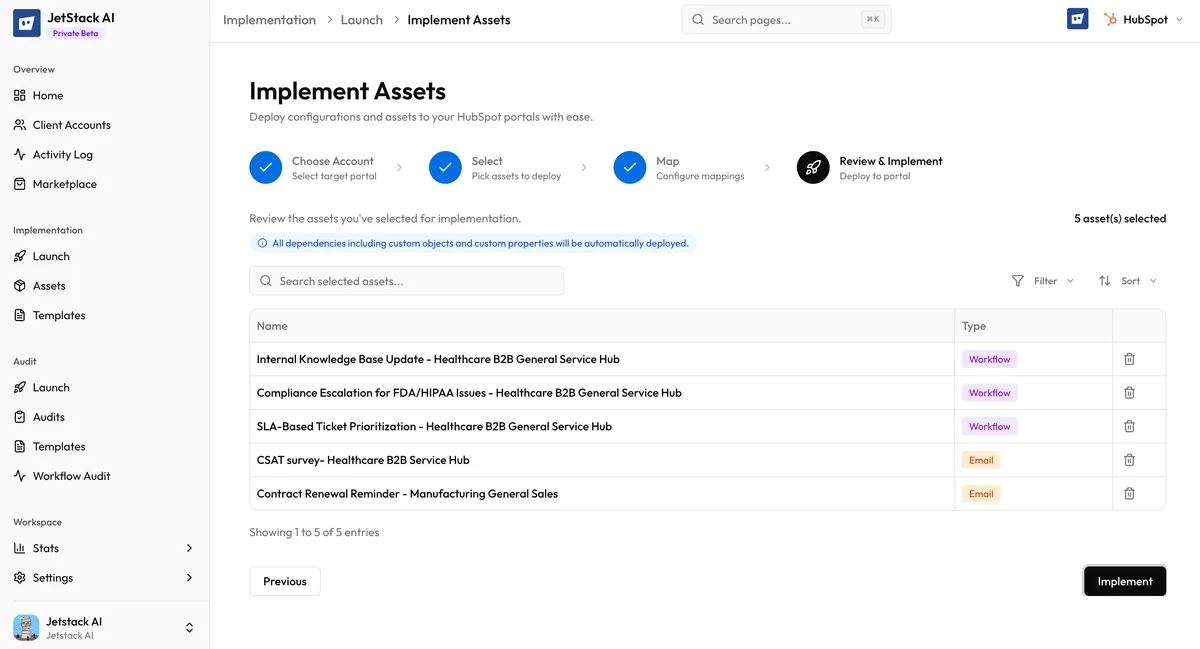
After selecting your assets, click Next to proceed to the mapping step. JetStack AI analyzes all selected assets and their dependencies to determine which mappings are needed. You will see an “Analyzing your assets” loading state for a few seconds while this analysis runs.
If no mappings are required — for example, if you are deploying only templates and modules — the wizard automatically advances to the Review step. Otherwise, you are presented with the mapping interface. See: